React Child Component Cheatsheet 📄
Table of Contents
- 1. Nested Components
- 2. Child Components
- 3. Manipulating Children Components
- 4. Modifying Children Components
1. Nested Components
Nested Components is children nested inside parent components. It simply help us create more complex UI structures.
For instance, a pseudo of nested html tags.
<html>
  <toolbar></toolbar>
  <content>
    <table></table>
  </content>
</html>
2. Child Components
For instance, we have two <Item /> components nested inside a <List /> component.
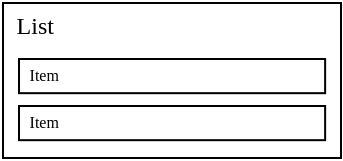
<List>
  <Item />
  <Item />
</List>
We can use props.children to access the nested children components of a parent component.
Class List extends React.Component {
  render() {
    return <>{this.props.childrent}</>;
  }
}
Live demo is available on CodePen.
2.1. Everything Can be a Child Component
In React, children don’t have to be components, they can be anything.
For instance, we can pass <List /> component some text as child.
<List>Hello World!</List>
2.2. Function as a Child Component
We can pass a render function to a component as the children prop.
<Executor>
  {(msg) => <p>Hello {msg}!</p>}
</Executor>
And the Executor component will look something like this.
class Executor extends React.Component {
  render() {
    return this.props.children('World');
  }
}
Live demo is available on CodePen.
3. Manipulating Children Components
props.children can be any type, such as array, function, object, etc.
React provides a bunch of utilities to manipulate any type of props.children as following.
3.1. Looping Children Components
React provides two utilities React.Children.map and React.Children.forEach to loop over children components.
React.Children.map
Return: a child, null, or undefined.
class IgnoreSecondChild extends React.Component {
  render() {
    const children = this.props.children;
    return (
      <div>
        {React.Children.map(children, (child, index) => {
          if (index == 1) return; // Ignore the second child
          return child;
        })}
      </div>
    );
  }
}
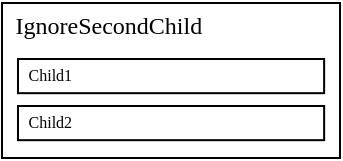
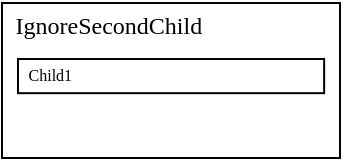
<IgnoreSecondChild /> components maps over all its children but ignoring the second child and returning all others.
<IgnoreSecondChild>
  <h1>Child1</h1>
  <h1>Child2</h1> { /* Ignore the second child */ }
</IgnoreSecondChild>
Live demo is available on CodePen.
3.2. Counting Children Components
React provides React.Children.count utilities to count any type of children.
class ChildrenCounter extends React.Component {
  render() {
    return <p>React.Children.count(this.props.children)</p>;
  }
}
It would returns the number of children no matter what type they are.
<ChildrenCounter>
  Hello World!
</ChildrenCounter>
Live demo is available on CodePen.
3.3. Converting Children Components to an Array
React provides React.Children.toArray utilities to convert the children to an array. This would be useful if you needed to sort the children component.
class ChildrenSorter extends React.Component {
  render() {
    const child = React.Children.toArray(this.props.children);
    return <p>{child.sort().join(' ')}</p>;
  }
}
It would render the sorted strings.
<ChildrenSorter>
  {'map'}{'forEach'}{'count'}{'toArray'}
</ChildrenSorter>
Live demo is available on CodePen.
3.4. Enforcing Only One Child Component
React provides React.Children.only utilities to verifies that children has only one child (a React element) and returns it. Otherwise this method throws an error.
class Executor extends React.Component {
  render() {
    return React.Children.only(this.props.children());
  }
}
Live demo is available on CodePen.
4. Modifying Children Components
For instance, we have a <RadioGroup /> component which contain many <RadioButton /> components (in raw html <input type="radio"> inside a <label>).
render() {
  <RadioGroup>
    <RadioButton value="1">1</RadioButton>
    <RadioButton value="2">2</RadioButton>
    <RadioButton value="3">2</RadioButton>
  </RadioGroup>
}
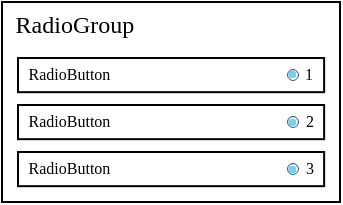
The inputs are not grouped as they don’t have the same name attributes.
We can modify and assign a name property to every single <RadioButton /> components as following.
render() {
<RadioGroup>
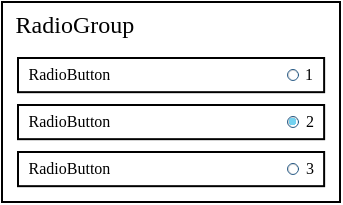
<RadioButton name="rate" value="1">1</RadioButton>
<RadioButton name="rate" value="2">2</RadioButton>
<RadioButton name="rate" value="3">2</RadioButton>
</RadioGroup>
}
But what we want is to pass the <RadioGroup /> components a unique name and its child will get and have its name automatically.
4.1. Modifying Children Props
In <RadioGroup /> components we will add a new method called renderChildwhere we will modify the children props.
class RadioGroup extends React.Component {

  renderChildren() {
    // TODo: Change the name prop of all children
    // to this.props.name
    return this.props.children;
  }

  render() {
    return (
      <div>
        {this.renderChildren()}
      </div>
    )
  }
}
We do map loop over the children components to get each individual child in renderChildren method.
renderChildren() {
  return React.Children.map(this.props.children, child => {
    // TODO: Change the name prop of all children
    // to this.props.name
    return child;
  })
}
So far, How can we modify the children properties?
4.2. Cloning Elements
React provides React.cloneElement utilities to clone and return a new React element.
React.cloneElement takes 2 arguments, an element we want to clone and an object of props we want to be set on the cloned element.
For instance
const cloned = React.cloneElement(element, {
  name: 'rate'
});
The cloned element will now have the name prop set to “rate”.
Get back to <RadioGroup /> components, we will clone each child and set the name prop of the cloned child to this.props.name.
renderChildren() {
  return React.Children.map(this.props.children, child => {
    return React.cloneElement(child, {
      name: this.props.name
    })
  })
}
Then we pass a unique name to each <RadioGroup /> components.
<RadioGroup name="rate">
  <RadioButton value="first">First</RadioButton>
  <RadioButton value="second">Second</RadioButton>
  <RadioButton value="third">Third</RadioButton>
</RadioGroup>
Instead of manually having to set the name attribute to each components, we just tell our <RadioGroup /> what we want to the name to be.
The complete instance.
class RadioGroup extends React.Component {

  renderChildren() {
    return React.Children.map(this.props.children, child => {
      return React.cloneElement(child, {
        name: this.props.name
      });
    })
  }

  render() {
    return (
      <div className="group">
        {this.renderChildren()}
      </div>
    )
  }
}

class RadioButton extends React.Component {
  render() {
    return (
      <label>
        <input type="radio" value={this.props.value} name={this.props.name} />
        {this.props.children}
      </label>
    );
  }
}

ReactDOM.render(
  <RadioGroup name="rate">
    <RadioButton value="first">First</RadioButton>
    <RadioButton value="second">Second</RadioButton>
    <RadioButton value="third">Third</RadioButton>
  </RadioGroup>,
  document.getElementById('app')
);
Live demo is available on CodePen.
References
Thanks for reading ❤
Say Hello! Twitter | Github | LinkedIn | Facebook | Instagram